The order of getting things working will be:
I. Set up Eclipse with Android Development SDK and ADT emulator
II. Create a new Android Project with APG and Bouncy Castle incoporated in
I. Setting up Android Development on Eclipse, roughly following the Android SDK Installation Guide.
- Download Eclipse Classic. (Windows: if it asks, install Java SDK)
- Download the Android SDK. (Windows: if it says Java SDK not found when you have installed it, hit "Back" and "Next" :/ ... good job Windows)
- Get the Eclipse ADT Plugin for Android Emulator in Eclipse by doing:
Select Help > Install New Software. Add at top right, Name: "ADT Plugin", Location: "https://dl-ssl.google.com/android/eclipse/", or "http: ..". Okay. Next. Next. Accept. Finish. Restart Now.
Check that this exists: "Window > Android SDK and AVD Manager" If you get this error: "Location of the Android SDK has not been setup in the preferences". You need to do: a) Window > Preferences > Android b) Put in appropriate path file for the "android-sdk-[OS name]" directory in SDK Location, which should come from your "Android SDK" download (If you downloaded the .exe for Windows, download the zip) c) Apply. OK
- Install Android Packages on ADT:
Click on "Window > Android SDK and AVD Manager"
Click on "Available packages" on the left.
Check the "Android Repository".
Press "Install Selected" and "Install"
II. Creating our own Android Virtual Device (AVD) with the APG Project and Bouncy Castle installed on it, roughly following the Android Creating AVDs Guide.
I tried debugging that "stopped unexpectedly" error for a long time. Here are the things I learned:
Finding the base java file: I tried to match up with the tutorial by grepping for "extends Activity". I found it in the org/thialfihar.android.apg/BaseActivity.java file, which also has onCreate().
Debugger can be useless: I tried placing a break in the first line of the main function in the basefile. When I ran Run > Debug History and started stepping through the files, a lot of Source not found came up. It was misleading, because when I tried breaking in similar fashions in a working "Hello Android" project, the same "Source not found" errors came up.
LogCat is supposed to help debugging, but since I had no idea what the code was about, it wasn't helpful for me.
- If you don't have SVN, install it. (For Windows, download TortoiseSVN will require restart)
- SVN checkout the APG source code. (If you're using TortoiseSVN. Create a folder named "android-privacy-guard-read-only", right click on it, click on "SVN Checkout", and paste the url in.)
- Download the Bouncy Castle source code, which should extract to "bc145_reduced_for_apg" folder
- Create a new Android project on Eclipse:
- File > New > Project
- Click on Android > Android Project. Next. Fill in the rest as the picture shows:
- Replace with the APG source code: Navigate to workspace/Apg and replace everything inside there with the files in the Apg source you downloaded in the previous step (so replace src, res, AndroidManifest.xml, etc).
- Add the Bouncy Castle code: copy the bouncycastle2 directory (inside bc145_reduced_for_apg/org) into workspace/Apg/src/org
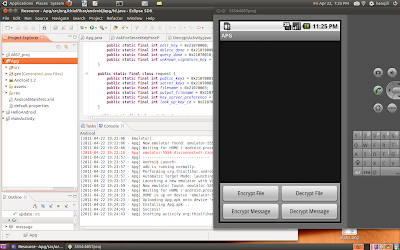
- Run > run: (warning, it'll take a while, a black blank screen doesn't mean it's broken). You should see something like:
- Extra: If the size of the emulator is too big. You can resize it by:
Run > Run Configurations > Target [a tab]
Write in Additional Emulator Command Line Options: "-scale 0.8" or another number - DONE!


Useless stuff: the long way of doing #4 onwards
- Create a new Android project on Eclipse:
- File > New > Project
- Click on Android > Android Project. Next.
- Project name: "6857proj". Target Name: "Android 1.6". Package Name: "org.thialfihar.android.apg". Create Activity: "proj6857". Finish.
- Make a new AVD for this project:
- select "6857proj" form the "Package Explorer" on the left side.
- Run > Run
- "Yes" to "No compatible targets were found. Do you wish to add a new AVD?"
- "New" on top right
- Name: "6857avd" Target: "Android 1.6". Create AVD
- Select on the "6857avd" and click "Start". "Launch".
- Wait for 3+ minutes for the Android emulator to turn on
- Add the APG source code into our Android Project:
- copy all the files and folders inside "android-privacy-guard-read-only -> src -> org -> thialfihar -> android -> apg" into to "[your Eclipse] workspace -> 6857proj -> src -> org -> thialfihar -> android -> apg"
- Add the Bouncy Castle code into our Android Project:
- copy this directory "bc145_reduced_for_apg -> org -> bouncycastle2" into "[your Eclipse] workspace -> 6857proj -> src -> org". So you should end up with "thialfihar" and "bouncycastle2" in the "org" directory.
- Put the APG resources into the res of the Android Project:
- delete the "res" directory in the workspace, and replace it with APG's "res"
- Run > run: (warning, it'll take a while, a black blank screen doesn't mean it's broken)
If you can't run due to errors like "The method xx of type xx must override a superclass", do:
- Project > Properties
- Under "Java Compiler," change the compiler compliance level from "1.5" to "1.6". Apply.
- Now you should be able to run.
- Done!
- To fix this warning below, you have to replace the "AndroidManifest.xml" with the Apg's version too.
Sorry!
The application APG (process org.thialfihar.android.apg) has stopped unexpectedly.
Please try again.

- Extra: If the size of the emulator is too big. You can resize it by:
Run > Run Configurations > Target [a tab]
Write in Additional Emulator Command Line Options: "-scale 0.8" or another number

I tried debugging that "stopped unexpectedly" error for a long time. Here are the things I learned:
Finding the base java file: I tried to match up with the tutorial by grepping for "extends Activity". I found it in the org/thialfihar.android.apg/BaseActivity.java file, which also has onCreate().
Debugger can be useless: I tried placing a break in the first line of the main function in the basefile. When I ran Run > Debug History and started stepping through the files, a lot of Source not found came up. It was misleading, because when I tried breaking in similar fashions in a working "Hello Android" project, the same "Source not found" errors came up.
LogCat is supposed to help debugging, but since I had no idea what the code was about, it wasn't helpful for me.
No comments:
Post a Comment